1. Why Learn to Build a Robot Arm
(1) Integration of Multidisciplinary Knowledge
The mechanical arm is one of the more representative learning platforms in Robotics Kits, covering key knowledge such as mechanical structures, motion control, and programming.
The design and control of a mechanical arm involve multiple disciplines. It not only helps learners grasp the basic principles of robots but also provides opportunities to gain an in-depth understanding of complex control systems and robotic technology.
The multifunctionality, wide applications, challenges, and hands-on operability of a mechanical arm make it a very central component in robotics learning. Therefore, it is a very typical STEM learning tool.
(2) High Practical Value
In education, as a teaching tool, a mechanical arm can help students understand robot control, programming, and automation principles more intuitively. Many robotics education institutions and universities use it as the main equipment for courses and experiments.
In vocational skills training, many professional fields related to automation and robotics (such as robot programming, maintenance of automated equipment, and industrial control) require knowledge of mechanical arm operation and programming. Therefore, a mechanical arm kit also plays an important role in vocational education and skills training.
In scientific research, mechanical arms are widely used for research testing and technology verification in fields such as artificial intelligence, automatic control, and robot vision. Many innovative technologies, such as deep learning, visual recognition, and the Internet of Things, are experimentally verified through mechanical arms.
Therefore, for students, a Robot Arm is an ideal transition from basic motor control to the concept of real industrial robots.
(3) Understanding Kinematics in Building and Programming
A mechanical arm usually has multiple degrees of freedom (DOF) and can perform complex three-dimensional movements, which makes it very suitable for learning kinematics and control algorithms. Through programming, learners can achieve a variety of tasks, complete path planning, and understand control systems.
Therefore, by building a mechanical arm, learners can intuitively understand core technologies such as “multi-DOF control,” “motion in coordinate space,” and “servo principles.”
(4) Turning Abstract Concepts into Concrete Perception
Learning with a mechanical arm kit can transform abstract programming concepts into perceptible learning, mainly because it combines feedback from the physical world with programming control, allowing learners to directly see how programming instructions affect a robot’s behavior in the real world.
In traditional programming learning, many concepts (such as variables, conditional statements, loops, and functions) are usually only “indirectly” perceived by running code on a computer. A mechanical arm directly associates these abstract concepts with physical actions in the real world.
By programming to control the arm’s movements and gripping actions, learners can immediately see the actual effect of code instructions. This connection from abstract to concrete makes programming more intuitive and easier to understand.
Therefore, this way of learning from the abstract to the concrete not only makes programming more vivid and intuitive but also helps students deepen their understanding of programming principles, control algorithms, and robotic technology. For beginners, this is more attractive and rewarding than any purely code-based learning.
2. Understanding the Robot Arm Kit: Its Structure and Core Functions
The Robot Arm Kit is a teaching-type mechanical arm learning tool. Through assembly, wiring, and programming, learners master mechanical motion principles and automatic control methods.
Key Components:
- Servo motor system (Servo Motors): responsible for joint movement and gripper control;
- Control board (such as ESP32 or Arduino): responsible for computation and signal transmission;
- Power system: ensures stable power output;
- Operating methods: usually include joystick control, Web/App control, and automatic programming.
Function Extensions:
- Multi-DOF (4DOF / 6DOF) motion control;
- Grasping path recording and action repetition;
- Support for graphical programming (such as ACECode) and C/C++ programming (Arduino IDE).
A good Robot Arm Kit should give equal consideration to “stability,” “teaching logic,” and “expandability,” rather than merely pursuing mechanical specifications.
That is, it should run stably and reliably and be suitable for repeated practice; it should have complete tutorials and a systematic teaching path; and the product should be able to continue advancing, expand to new projects, and support long-term learning growth.
Only by balancing these three points is it truly an excellent Robot Arm Kit.
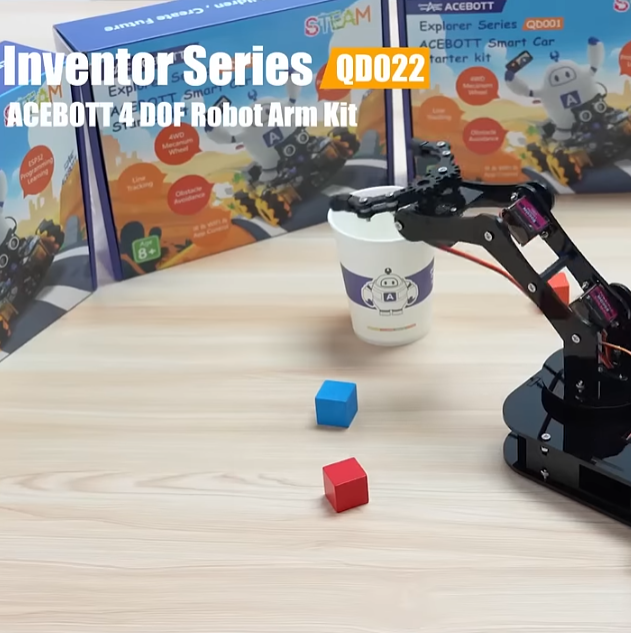
3. Build Process Guide — Using ACEBOTT QD022 as an Example
(1) Preparation Stage
- Check the completeness of the parts pack (acrylic structures, servos, wires, gripper, control board, screw pack);
- Download the tutorial and download the mechanical arm tutorial document from the official website;
- Install ACECode or Arduino IDE software;
- Prepare batteries (two 18650 pointed batteries).
(2) Assembly Stage
- Install the base and the main arm;
- Install the forearm and the gripper module;
- After installation, gently move each joint by hand to ensure that each servo can move smoothly;
- When wiring, check the connection pins of each servo to prevent incorrect connections.
(3) Connection and Calibration
- Connect the mainboard and USB cable and confirm that the serial port is recognized successfully;
- Use a test program to verify whether the servo movements are normal;
- Upload the program for initializing servo angles and adjust each joint of the mechanical arm to the initial state.
(4) Programming Control
- Use the ACECode graphical programming interface to drag action modules to realize basic control;
- Use the Arduino IDE to write code to control multiple servo actions and coordinate system calculations;
- Test the Memory Function to allow the arm to record the grasping path and automatically reproduce actions.
(5) Function Expansion
- Use a joystick control module to realize real-time manual operation;
- Try Web/App control to remotely operate the mechanical arm;
- Introduce application scenarios such as “automatic sorting,” “repetitive handling,” and “precise positioning” in teaching projects.
(6) Safety and Debugging Suggestions
- Avoid servo overloading or jamming in the reverse direction during debugging;
- It is recommended to save the action script after debugging is completed for repeated teaching or demonstration use.
4. From Basics to Advanced — The Learning Path of a Robot Arm Kit
Stage 1: Basic Assembly and Understanding of Servos
This stage is the most critical starting stage in the entire learning path. It mainly helps learners understand mechanical structures, become familiar with servo control principles, and master the logic of initial programming and action control, laying a solid foundation for subsequent in-depth learning (such as kinematics, path planning, and automatic control).
Learning objectives:
- Recognize the structure of a mechanical arm;
- Learn servo installation and debugging;
- Initial assembly of a mechanical arm;
- Control a single servo action;
- Write simple action programs.
Stage 2: Control Logic and Motion Commands
The core of this stage is to master the collaborative control logic among multiple joints and learn to build coherent and repeatable mechanical arm actions through programming. You will transition from controlling a “single servo” to “controlling the entire mechanical arm” and initially understand the construction logic of mechanical arm actions.
Learning objectives:
- Multi-servo collaborative control;
- Action commands and execution sequences;
- Write action programs;
- Basic concepts of kinematics;
- Form an “action–task” mindset.
Stage 3: Path Planning and Automated Applications
This is the key stage for moving from “operating a mechanical arm” to “enabling a mechanical arm to complete tasks autonomously.” It elevates the previous servo control and action logic into a task system that is predictable, plannable, and automatically executable, stepping into true “robotic thinking.”
Learning objectives:
- Basic concepts of path planning;
- Derive required joint angles from target coordinates;
- Application of inverse kinematics;
- Design of automated tasks.
Learning with a Robot Arm Kit is not a one-off project but a growth path that can continue to develop. It is more like a learning path that progresses from shallow to deep and continues to grow. It can be continuously upgraded along with the learner’s cognitive level, technical ability, and application scenarios, gradually opening the door to multidisciplinary integration fields such as artificial intelligence, automation, control engineering, and mechanical design.
5. Common Questions and Troubleshooting
(1) Programming Upload Failure
- Check whether the mainboard is connected to the computer;
- Check whether the mainboard type is selected correctly;
- Check whether the serial port is selected correctly;
- Check whether library files are installed;
- Check whether batteries are installed.
(2) Servo Jitter or No Response
- Check whether batteries are installed;
- Check whether the battery level is sufficient;
- Check whether the servo wiring order is correct;
- Check whether the program is correct;
- Check whether the servo functions normally.
(3) Actions Not Coordinated
- Check whether the zero point has been recalibrated.
(4) Control Latency
- Check wireless connection and signal interference issues;
- Check whether a servo is jammed.
(5) Wi-Fi Cannot Connect
- Check whether the program for Wi-Fi control has been uploaded;
- Check whether the phone is connected to Wi-Fi;
- Check whether the batteries are turned on.
The process of solving problems is itself a core learning link in Robotics education. In robotics learning, “problem-driven” is far more important than “knowledge infusion.” When debugging robots, students often encounter issues such as incorrect servo angle settings, reversed circuits, and improper program delay settings. It is precisely through these setbacks and reflections that students truly understand the dependencies among systems and build a “structured knowledge network.”
6. Conclusion
Through the QD022 Robot Arm Kit, learners can not only understand the basic structure and control of a mechanical arm but also cultivate programming thinking and engineering logic.
For educators, it is an ideal tool that combines classroom and projects; for students, it is the first step toward more complex robotic systems.
Building a Robot Arm Kit is not just about completing a model but about understanding the process of “how machines think and act.”
Want your students or children to truly understand the principles of robots? Start with a STEM Programmable Robot Arm Kit like QD022.